How to Add an Email Account to My Iphone 11
Setting up Mobile Email Clients
These FAQs will teach you how to add your 123 Reg email account to a mobile device such as iPhone, Android and Windows mobile
Simply click on a title below to skip to the most appropriate FAQ. You can also click the Top button to return and make another selection.
How to set up email on an iPhone
This FAQ will help you to set up your email on your iPhone.
Please note: You can use the below steps to set up any mailbox. You will however need to use your providers details when we mention ours.
Step 1 of 11
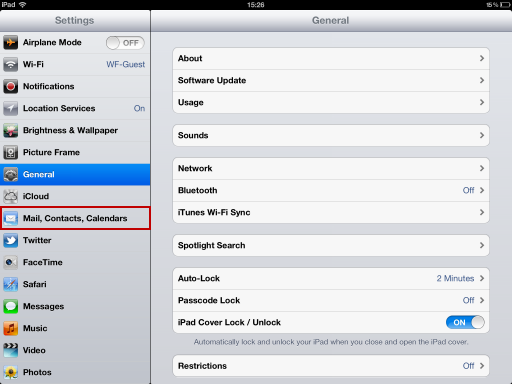
Tap on the Settings icon.

Step 2 of 11
Tap on Mail, Contacts, Calendars.

Step 3 of 11
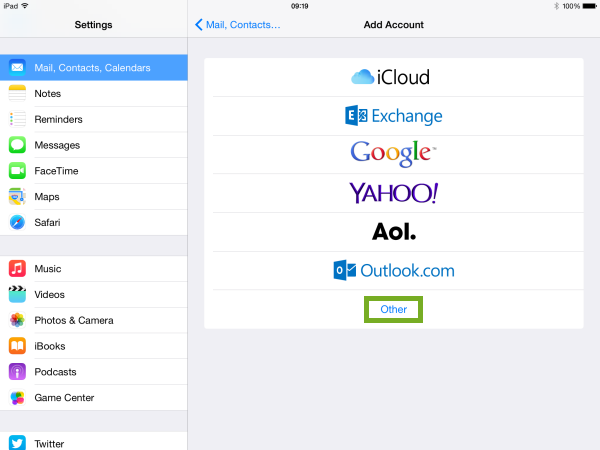
Tap on Add Account.

Step 4 of 11
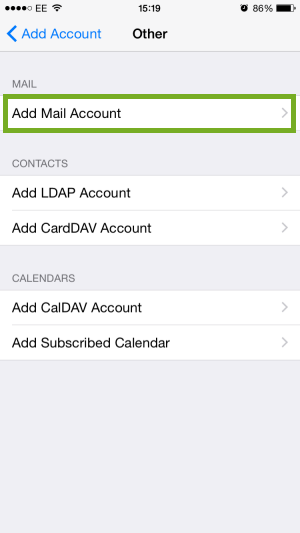
Tap on Other.

Step 5 of 11
Tap on Add Mail Account.
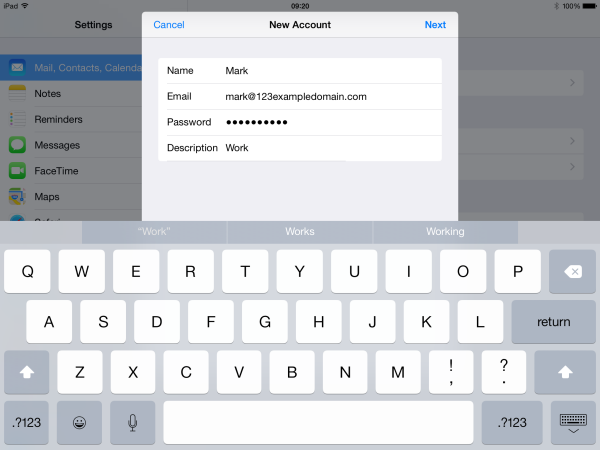
Step 6 of 11
Enter your name, the email address you wish to add and the email address password.
You can now enter a description to help recognise the mailbox.
Once this is done tap on Next.

Step 7 of 11
Tap on IMAP.
You can now enter imap.123-reg.co.uk as the host name.
The username is the email address you are adding and the password is the email address password.

Step 8 of 11
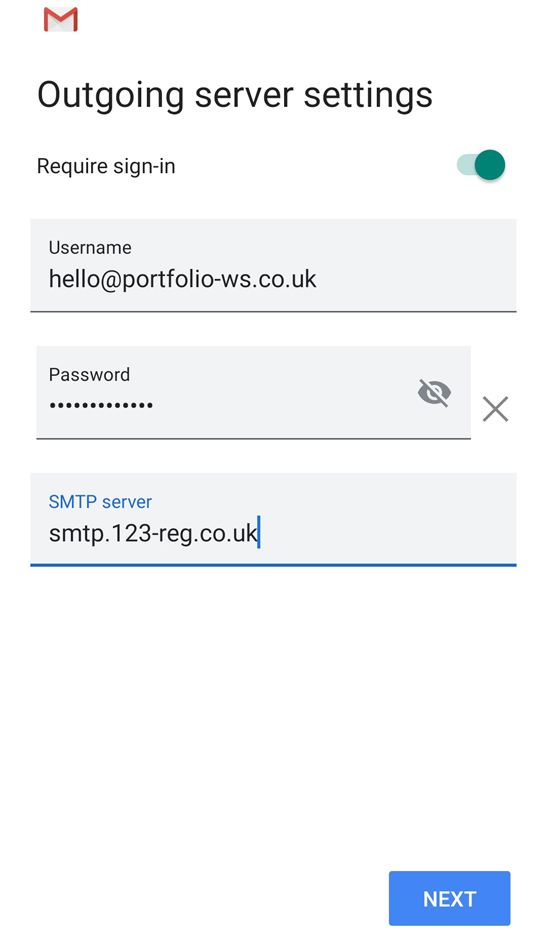
Enter smtp.123-reg.co.uk as the outgoing host name.
The username is the email address you are adding and the password is the email address password.
Once all the settings have been entered tap on Next.

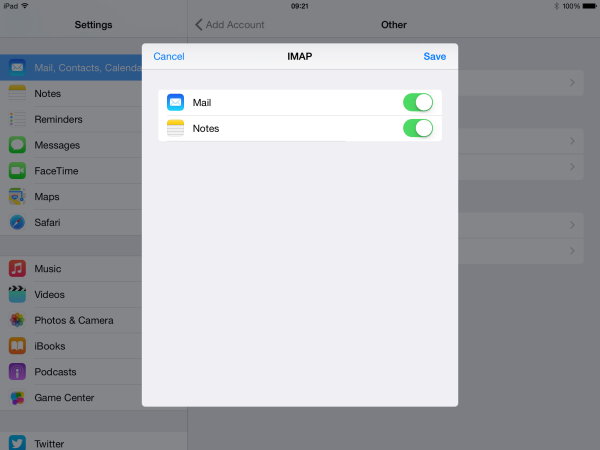
Step 9 of 11
Make sure Mail is switched on and then tap on Save.

Step 10 of 11
Go back to the homescreen and tap on Mail.

Step 11 of 11
That's it, your can now start sending and receiving email straight away.

How do I set up 123 Reg mobility on my iPhone?
Using mobility with your iPhone will allow you to sync your email, contacts, calendar and tasks from your 123 Reg mailbox to your iPhone.
Please note: In order to get your mailbox and mobility features working with your smartphone, you will need to set up your mailbox as a Microsoft Exchange mailbox.
This is so that the push content technology will work across your mailbox and smartphone.
Step 1 of 8
Go to Settings on the iPhone.

Step 2 of 8
- Once in the settings menu click on the Mail, Contacts, Calendars button.

Step 3 of 8
Then click Add Account…

Step 4 of 8
Select the Microsoft Exchange option.

Step 5 of 8
You will now need to fill in your Email Address, Username (which is your email address) and your Email address password.
You can also name the account in the Description box.
Once completed click on Next.

Step 6 of 8
An error message may appear saying Cannot Verify Server Identity. If this message appears then click on Continue.

Step 7 of 8
You will now need to enter the 123 Reg email server details. As you are using Mobility, your server details will be webmail.123-reg.co.uk.

Once entered click on the Next button.
Step 8 of 8
You will now see the details being verified and accepted. The next screen will show you what can be synced and give you the option to select them on or off.
Once completed click on the Save button.

That's it you are all set up and ready to start using 123 Reg email on your mobile phone.
How to set up email on an iPad
This FAQ will help you to set up your email on your iPad.
Please note: You can use the below steps to set up any mailbox. You will however need to use your providers details when we mention ours.
Step 1 of 11
Tap on the Settings icon.

Step 2 of 11
Tap on Mail, Contacts, Calendars.

Step 3 of 11
Tap on Add Account.

Step 4 of 11
Tap on Other.
Step 5 of 11
Tap on Add Mail Account.

Step 6 of 11
Enter your name, the email address you wish to add and the email address password.
You can now enter a description to help recognise the mailbox.
Once this is done tap on Next.
Step 7 of 11
Tap on IMAP and enter imap.123-reg.co.uk as the host name.
The username is the email address you are adding and the password is the email address password.

Step 8 of 11
Enter smtp.123-reg.co.uk as the outgoing host name.
The username is the email address you are adding and the password is the email address password.
Once all the settings have been entered tap on Next.

Step 9 of 11
Make sure Mail is switched on and then tap on Save.
Step 10 of 11
Go back to the homescreen and tap on Mail.

Step 11 of 11
That's it, you can now start sending and receiving email straight away.

How do I set up 123 Reg mobility on my iPad?
This article will explain how to setup 123 Reg mobility with your iPad.
Using mobility with your iPad will allow you to sync your email, contacts, calendar and tasks from your 123 Reg mailbox to your iPad.
Please note: In order to get your mailbox and mobility features working with your smartphone, you will need to set up your mailbox as a Microsoft Exchange mailbox.
This is so that the push content technology will work across your mailbox and smartphone.
Step 1 of 8
Go to Settings on the iPad.

Step 2 of 8
Once in the settings menu click on the Mail, Contacts, Calendars button.
Step 3 of 8
Then click Add Account…

Step 4 of 8
Select the Microsoft Exchange option.

Step 5 of 8
You will now need to fill in your Email Address, Username (which is your email address) and your Email address password.
You can also name the account in the Description box.
Once completed click on Next.

Step 6 of 8
An error message may appear saying Cannot Verify Server Identity. If this message appears then click on Continue.

Step 7 of 8
Now you need to enter your server details. As you are using 123 Reg Mobility, your server details will be webmail.123-reg.co.uk.
Once entered click on the Next button.

Step 8 of 8
You will now see the details being verified and accepted. The next screen will show you what can be synced and give you the option to select them ON or OFF.
Once completed click on the Save button.

That's it you are all set up and ready to start using 123 Reg mobility.
How to set up email on Android
This FAQ will help you to set up your mailbox on Android.
Please note: You can use the below steps to set up any mailbox. You will however need to use your providers details when we mention ours.
Step 1 of 9
Open the Gmail app on your Android device and select your profile icon. From there, select the option Add another account.

Step 2 of 9
On the next page, select the option Other.

Step 3 of 9
Enter your email address into the field and select the option Manual Setup below.

Step 4 of 9
Select the IMAP option below.

Step 5 of 9
Enter the password for your email address.

Step 6 of 9
For the Incoming server settings, enter imap.123-reg.co.uk into the Server field. Once done, select Next.

Step 7 of 9
For the Outgoing server settings, enter smtp.123-reg.co.uk into the Server field. Once done, select Next.
Step 8 of 9
Tick the options you wish to include for your account.

Step 9 of 9
Enter the name that you would like to be displayed on your sent messages. Once done, select Next. Your email is now setup.

How do I setup a email account on my Windows Phone?
Using email with your device will allow you to sync your email, contacts, calendar and tasks from your 123 Reg mailbox to your phone.
Follow this step-by-step instructions and get more information on how to add your 123-mail account to your Windows, or Lumia mobile device.
These steps can be followed when setting up any email account on a Windows mobile phone.
Step 1 of 19
From the Start screen flick left to reveal the App list.

Step 2 of 19
Tap on the Settings icon.
![]()
Step 3 of 19
Select the Email + accounts option.

Step 4 of 19
Tap Add an account.

Step 5 of 19
Then select Other account.

Step 6 of 19
Press the Email address box and type in your email address.

Step 7 of 19
Tap on the Password box and then enter your password.

Step 9 of 19
If the settings are not found, tap Try Again then select Advanced.

Step 10 of 19
Then select Internet email account.

Step 11 of 19
Enter a name for the email account in the Account name

Step 12 of 19
Type the name that you want to appear when sending emails from this account in the Your name field.

Step 13 of 19
In the Incoming email server field enter the incoming server details.
IMAP allows you access your email from multiple locations, clients and devices as it doesn't require downloading of your email content. We recommend using IMAP settings on Windows Live because if anything were to happen to your computer or mobile device, you would still be able to access your emails.
Enter imap.123-reg.co.uk as the incoming email server.

Step 14 of 19
Select the Account type that corresponds to the incoming server you selected in Step 11.

Step 15 of 19
In the Username field type the email address that you are setting up i.e john@mydomain.com and in the Password field type the password for your mailbox.

Step 16 of 19
In the Outgoing (SMTP) email server section enter: smtp.123-reg.co.uk

Step 17 of 19
Select the options Outgoing server requires authentication and Use the same username and password for sending emails.
Step 18 of 19
When you are finished tap Sign in to continue.

Step 19 of 19
Your mailbox is now setup and ready to use on your Windows Phone.
For more details on adding other email addresses to your Windows, or Lumia Phone, you can also access the official Windows Phone support website.

How do I install mobility with my Windows Phone?
This article will show you how to add 123 Reg Mobility to your Windows phone. This will allow you to sync your contacts, tasks and appointments from your email account to your phone.
Step 1 of 7
From the Settings menu, select Email and Accounts, and then select the Add an Account option.

Step 2 of 7
Select the Outlook account option.

Please note: If you have updated to Windows 8.1 then you will need to select the Exchange account option.
Step 3 of 7
Enter your email address and password into the fields provided.

Step 4 of 7
Enter the username and domain for the account. The username will be the prefix of your email address, so everything before the @ symbol. The domain will be everything after the @ symbol.

Step 5 of 7
You will see a warning message stating that your settings could not be found. Click on the Advanced button to continue.

Step 6 of 7
You will now need to enter the server details. In the Server box, enter webmail.123-reg.co.uk.

Step 7 of 7
At this point, you will be redirected back to the Email and Accounts page. You will see your new account synchronising. When it has finished synchronising everything will be set up; the your contacts, appointments and tasks should all be present on your phone.

How do I setup email on Blackberry?
This article will explain how to setup your Blackberry with your 123 Reg Mailbox
Following this article will allow you to get your email on your device, meaning that you're always connected
Follow the steps described below and learn how you can add your 123-mail account on your BlackBerry phone. These steps can be followed for setting up other email addresses on your mobile device.
Please note: The steps to set up your 123 Reg mailbox on your BlackBerry device may vary slightly depending on the model that you have. The below instructions are specifically for the Bold9700 model, however, further support can be found on the Blackberry Support Site.
Step 1 of 12
Click on Setup.

Step 2 of 12
Select Email Settings.

Step 3 of 12
Click on the Add button.

Step 4 of 12
Select Other.

Step 5 of 12
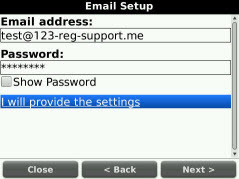
Enter the email address and the password.
Step 6 of 12
Select Next. You will then get an invalid message, click OK.

Step 7 of 12
Scroll down and re-enter the password.
Step 8 of 12
Select the I will provide the settings to add this email account option.
Step 9 of 12
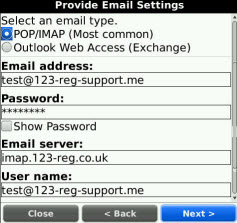
Scroll down and select email type. (POP/IMAP)
IMAP allows you to access your email from multiple locations, clients and devices as it doesn't require downloading of your email content. We recommend using IMAP settings on Windows Live because if anything were to happen to your computer or mobile device, you would still be able to access your emails.
To find out more about the POP3 and IMAP protocols, watch the following support video.
Step 10 of 12
Enter the Email Server: imap.123-reg.co.uk and your email address as the username.
Step 11 of 12
Click on Next
Step 12 of 12
Click on OK to confirm.
You have now setup your email on your Blackberry!
Please note: For further support about adding email on your phone, please contact your mobile service provider in regards to adding a POP3/IMAP account on your Blackberry handset.
How to Add an Email Account to My Iphone 11
Source: https://www.123-reg.co.uk/support/email/setting-up-mobile-email-clients/
0 Response to "How to Add an Email Account to My Iphone 11"
Post a Comment